Home » Candy Corn Rice Krispie Treats

Candy Corn Rice Krispie Treats

This post may contain Amazon or other affiliate links. As an Amazon Associate I earn from qualifying purchases. Click here to read our privacy policy.

I made these Rice Krispie treats and totally forgot to share them with you. These treats in their original square shapes are a hit in my house and a pan doesn’t last more than a day and these weren’t any different.  The possibilities are endless when making creations
using these addicting treats!
Ingredients:
6 tbsp butter or margarine, divided
6 cups mini marshmallows, divided
7 1/2 cups Rice Krispies cereal, divided
red and yellow food coloring
non-stick spray or additional margarine
6 oz. white chocolate for dipping

Instructions:

Grease two pieces of waxed paper, one large enough to line the a large bread pan and the other large enough to cover the top of the pan. Line bread pan with the larger piece, greased side up and set aside.
In a Dutch oven, melt 2 tbsp. margarine and then add 2 cups of mini marshmallows and stir until melted. Stir in 2 and a 1/2 cups cereal until well combined. Press into the bottom of the bread pan. I find sometimes that it’s easier to spray a bit of non-stick spray on my hands when pressing the mixture into the pan.

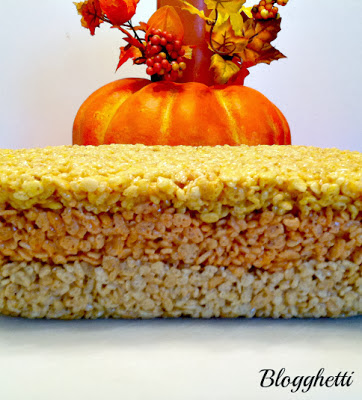
Now, wash the pan you used and begin the second layer. Melt 2 tbsp. margarine in the Dutch oven and then add 2 cups of mini marshmallows and stir until melted. Add 2 drops red food coloring and 3 drops yellow, and mix well. Add cups of mini marshmallows and stir until melted. Stir in 2 and a 1/2 cups cereal until well combined. Press into the bread pan on top of the first layer. Again, wash the pan.

Melt 2 tbsp. margarine in the Dutch oven and then add 2 cups of mini marshmallows and stir until melted. Add 5 drops yellow food coloring and mix well. Add 2 cups of mini marshmallows and stir until melted. Stir in the remaining cereal until well combined. Press into the bread pan on top of the orange layer. The mixture may not all fit into the pan, this is perfectly fine.

Take other piece of wax paper and place it on top of the pan, greased side down. Flip the entire pan upside down. press firmly down to help form the top layer. Flip the pan over again and allow it to set for 2 – 3 hours.

Remove the top wax paper and flip over the pan to remove the treat. Pull off the remaining wax paper. Using a sharp knife, and on a cutting board slice the treat into three sections lengthwise.
Take each of the three sections and slice into triangles. You’ll notice that some will not have yellow bases. Personally, the color is close enough to yellow for me so I don’t worry about it. However, if you prefer to have all yellow bases, then when you are making the bottom layer, simply add 5 drops of yellow food coloring when you are making that layer.

Dip the white portion (the tip of the triangle) of the treat into white chocolate.

Enjoy!

Leave a Reply

Your email address will not be published. Required fields are marked *

This site uses Akismet to reduce spam. Learn how your comment data is processed.