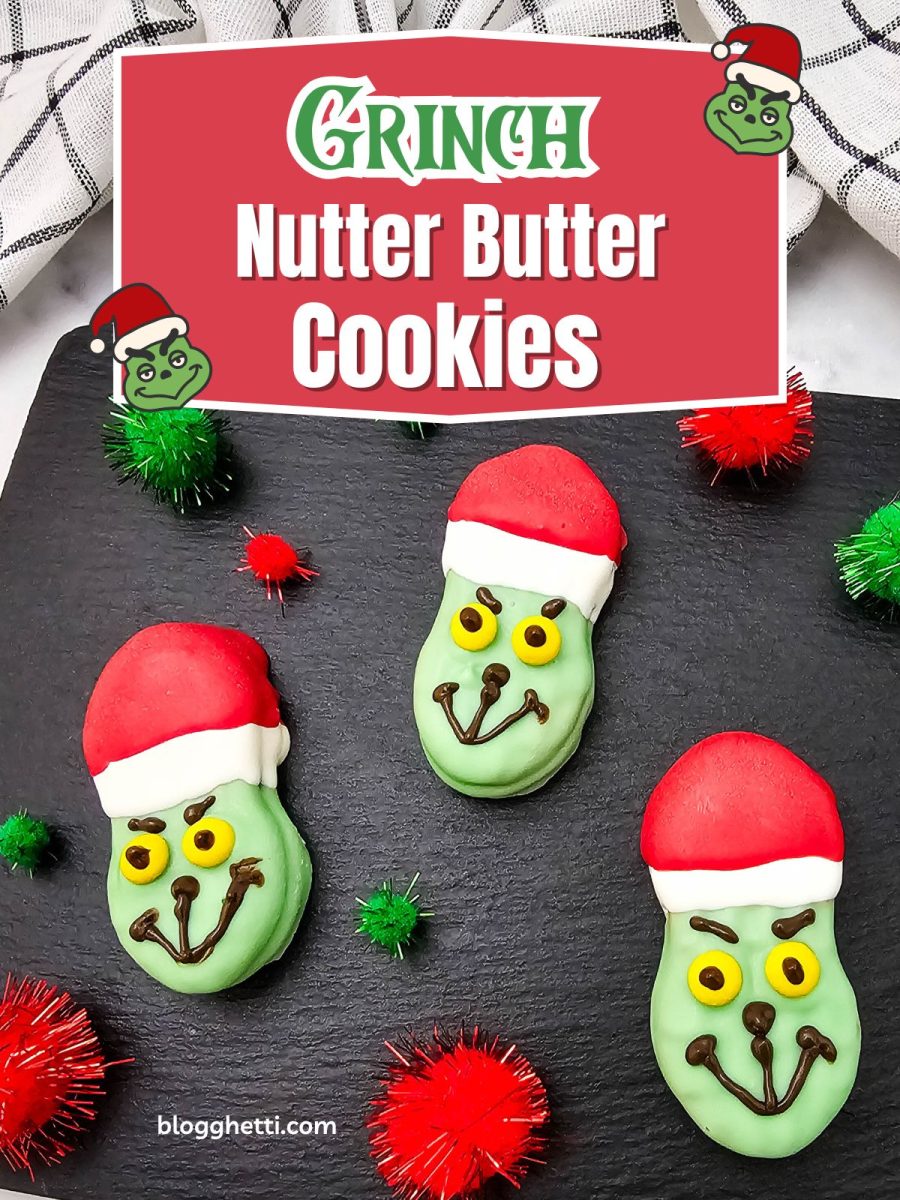
Grinch Nutter Butter Cookies
These festive Grinch Nutter Butter Cookies, much like Nutter Butter Snowman Cookies, are the simplest way to add a playful touch of holiday whimsy to your December celebrations. This no-bake recipe transforms a classic peanut butter sandwich cookie into the iconic green character from Whoville, complete with his Santa hat.
Add a playful twist to your holiday treats with these festive cookie bites that are fun to decorate and easy to share. Whether you’re making them for a Christmas party, a cookie exchange, or just a fun family activity, these cookies are guaranteed to steal the show (and maybe your heart, just like the Grinch’s did).
Grinch Nutter Butter Cookies were the hit of our holiday snack table last year. I set them out alongside bowls of Santa Munch Christmas Popcorn and a tray of Christmas Grinch Bark, and the mix of colors and flavors made the whole spread feel festive without being over the top. It reminded me that sometimes the simplest recipes end up being the ones people talk about long after the party.
Grinch Nutter Butter Cookies
Making these adorable character treats couldn’t be simpler! This is a total win for an easy, no-bake project that’s ready in minutes once your colorful candy melts are ready for dipping. If you’re looking for a last-minute sweet treat that’s easy, this recipe is perfect for that.
This recipe uses simple ingredients that are readily available at the grocery store. A classic, crunchy peanut-shaped cookie forms the base, then it’s covered in smooth, colorful candy melts with chocolate and candy details added to bring the Grinch to life.
Timesaving Tips and Variations
This recipe moves quickly when you have everything set out. Having parchment paper ready makes each step cleaner and keeps everything organized. Working in small batches, as I did, helps prevent the candy from cooling too fast.
- Substitute candy eyes for the yellow M&Ms.
- Sprinkle sanding sugar over the red hats before they set.
- Use almond bark in place of candy melts if that’s what you have.
- Add a small white candy pearl to the hat tip for extra detail.
- Draw the features with edible markers if preferred.
These simple swaps can help you customize the cookies to your supplies or style. No matter which variations you choose, the festive personality of each cookie still shines.
Other Christmas Treats to Enjoy
These cookies pair wonderfully with cozy holiday drinks, like this Grinch Mocktail for Kids, and other themed desserts. Their playful appearance makes them perfect for Christmas parties and cookie exchanges.
- Movie Night Charcuterie Board
- Christmas Wreath Treats
- Peppermint Crunch Cookies
- Chocolate Reindeer Cupcakes
They also add a cheerful touch to edible gift boxes or teacher treats. Wherever they go, they bring an instant dose of holiday fun.
Frequently Asked Questions
Chilling isn’t required, but letting the dipped cookies set fully at room temperature works best. This helps the candy coating stay smooth. Avoid refrigerating, as it can cause condensation.
A zip-top bag with a small corner snipped off works well. It gives you enough control to draw the facial features. Just be sure the dark chocolate is melted and smooth before piping.
Store the decorated cookies in an airtight container at room temperature for up to two weeks. Placing wax paper between the layers will prevent them from sticking or damaging the facial details. Avoid refrigerating, as condensation can make the candy melts tacky.
This post may contain Amazon or other affiliate links. As an Amazon Associate, I earn from qualifying purchases. For more information, see my disclosure policy.
Essential Tools for Grinch Nutter Butter Cookies
Reynolds Kitchens Stay Flat Parchment Paper Roll, Non Curling Baking Parchment Paper for Baking and Cooking, Oven Safe up to 425 Degrees, 36 Feet x 15 Inches, 45 Total Sq. Ft. NUTRIUPS 4.5inch Small Glass Bowls Set of 6, Tempered Glass Prep Bowl, Mini Bowls for Kitchen Microwave, Dishwasher and Oven SafePiping Bags and Tips Set, 100Pcs 12 Inch Pastry Bags, Icing Bags Disposable for Cakes Decorating Kit Supplies with 1 Reusable Piping Bags, 1 Couplers, 12 Frosting Tips, 2 Bag Ties, 3 Cake ScraperLenox 894166 Merry Grinchmas 4-Piece Assorted Accent Plate Set, Christmas Drinkware, Holiday Hosting


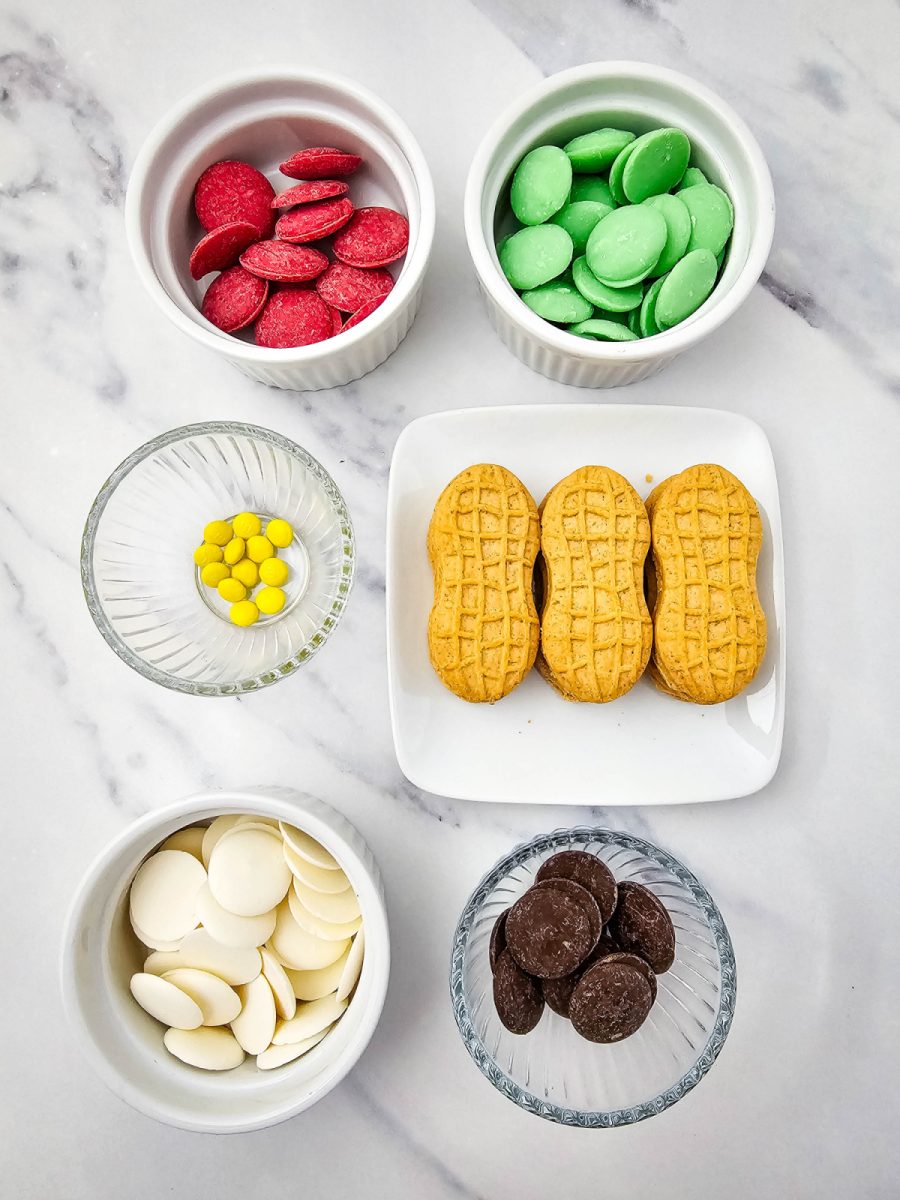
What You Need to Make Nutter Butter Grinch Cookies
To create these cheerful, no-bake cookies, you only need a few simple components, primarily relying on the store-bought base and easy-to-melt candy.
- Nutter Butters: the perfect base for shaping the face
- Light green candy melts: to create the face
- White candy melts: for the rim of the hat
- Red candy melts: to form the Santa hat
- Dark chocolate candy melts: for all the features
- Yellow mini M&Ms: the Mean One’s signature eye color
How to Make Grinch Nutter Butters
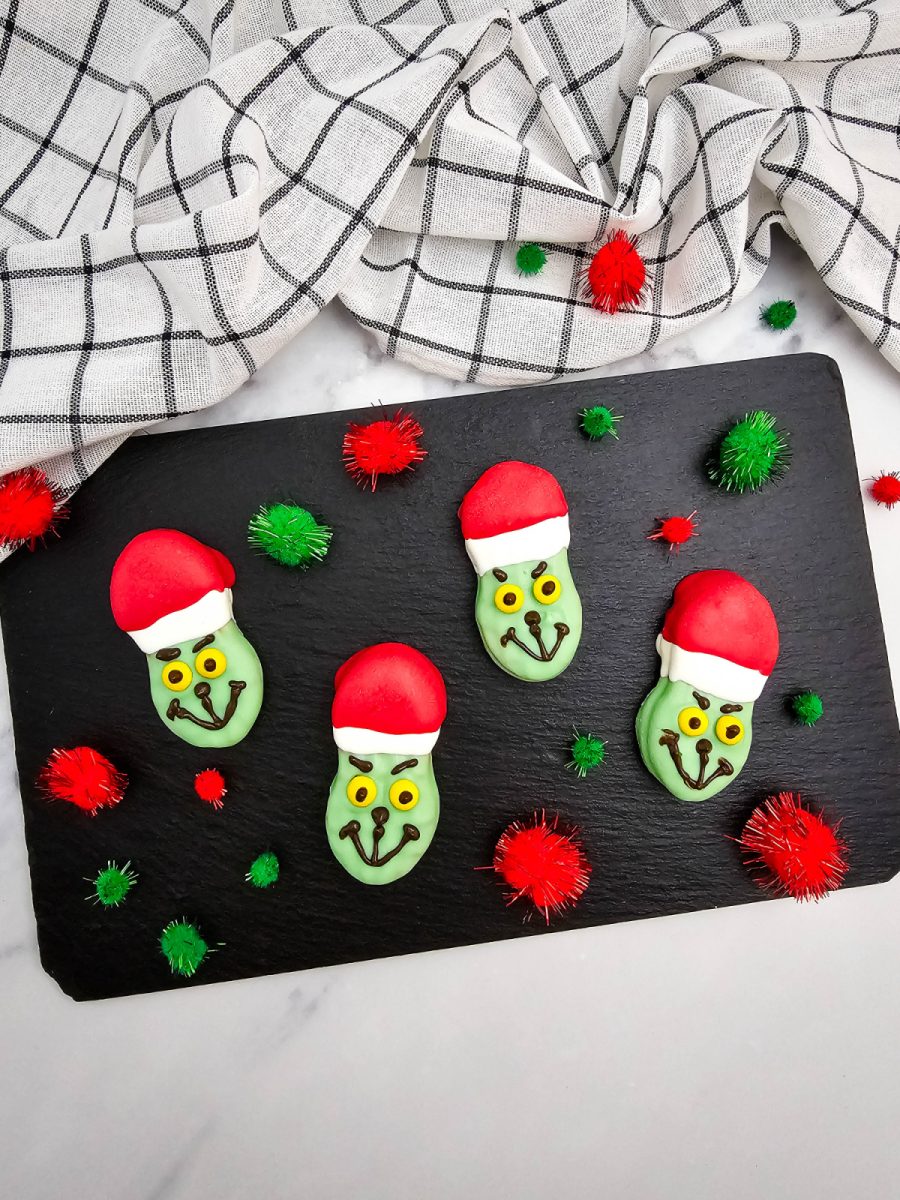
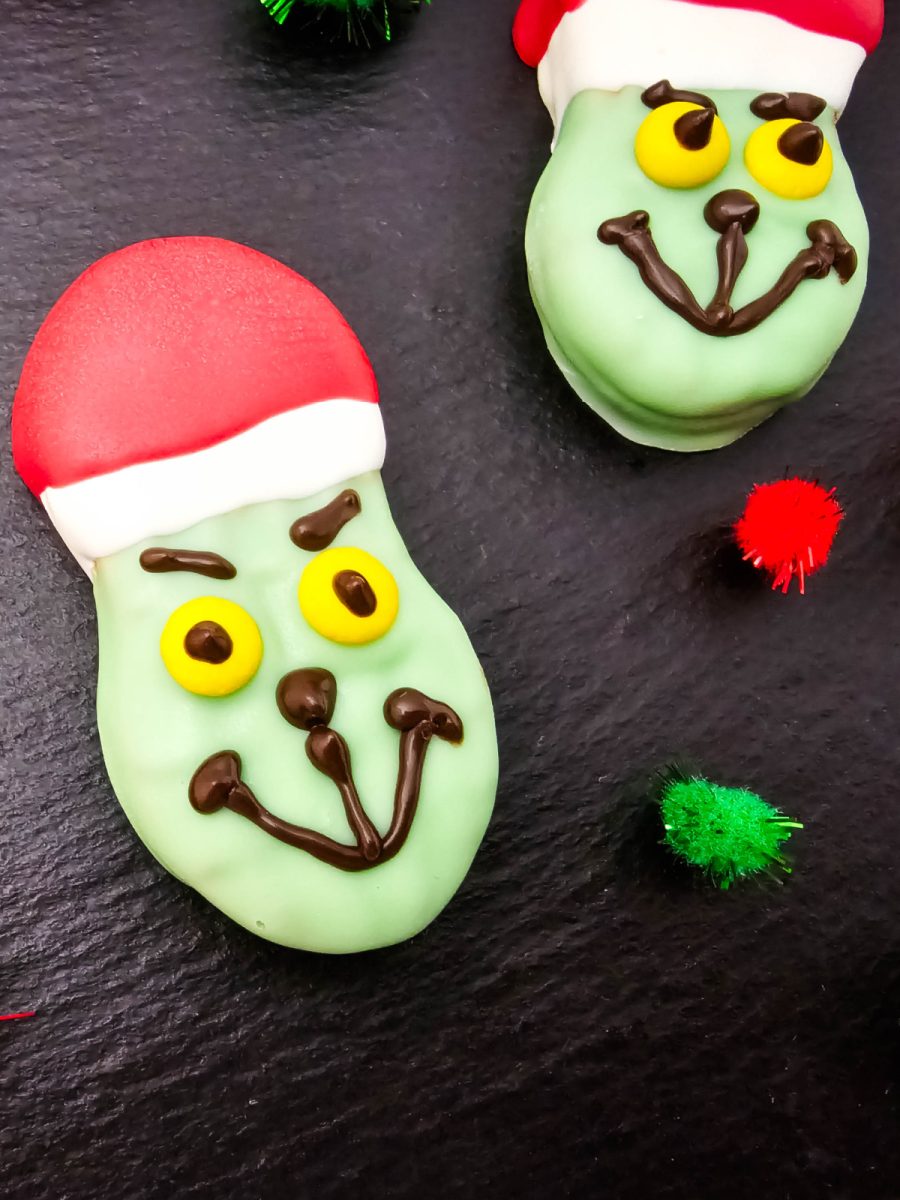
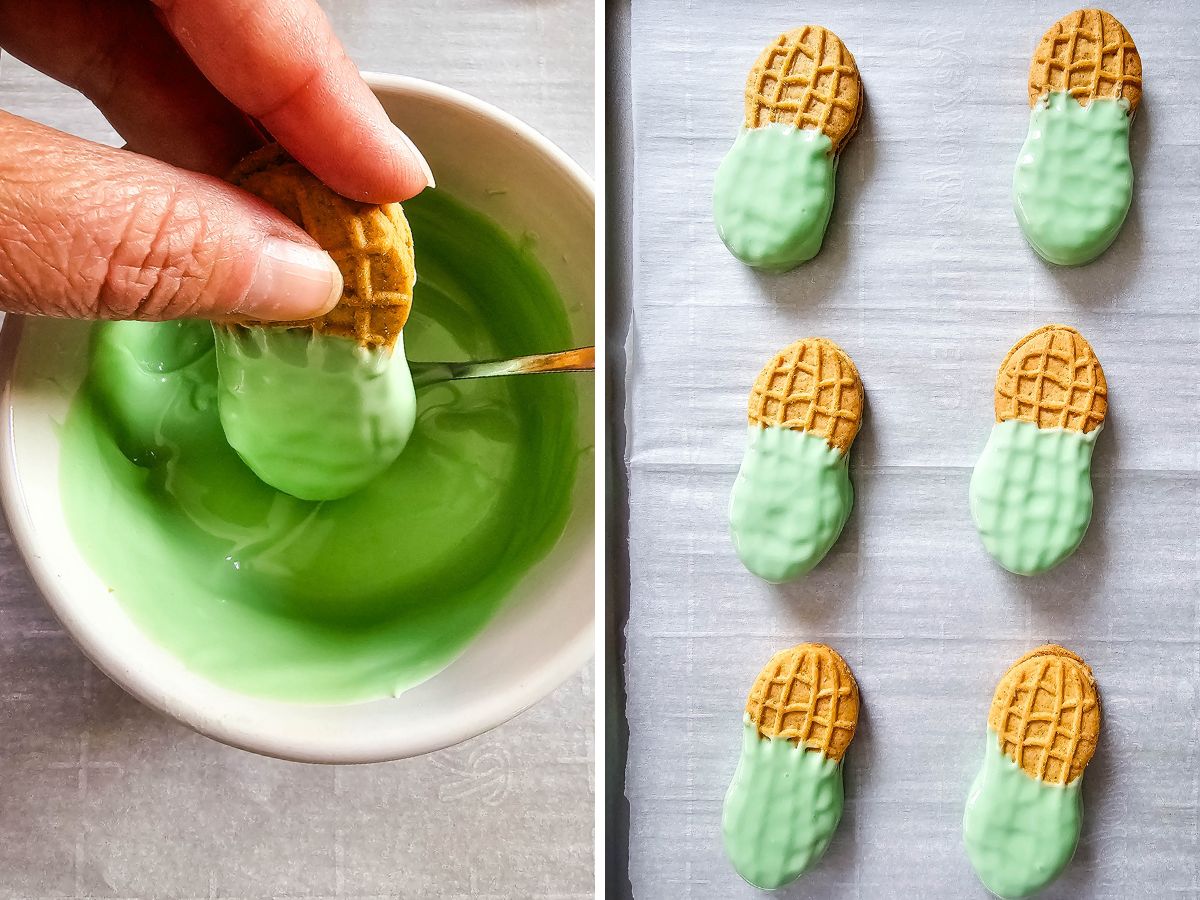
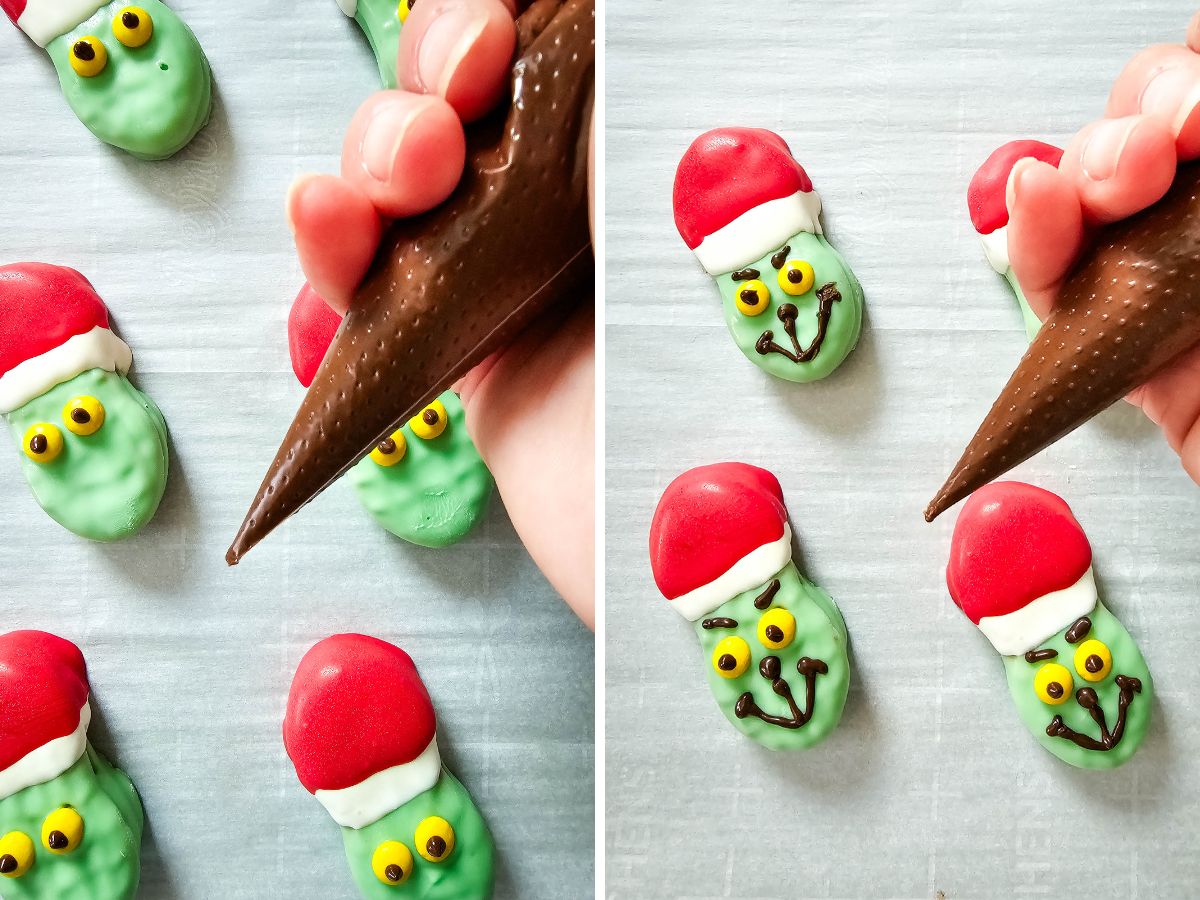
Melt green candy wafers in the microwave, according to the package directions. Dip half of each cookie, and place on parchment paper.
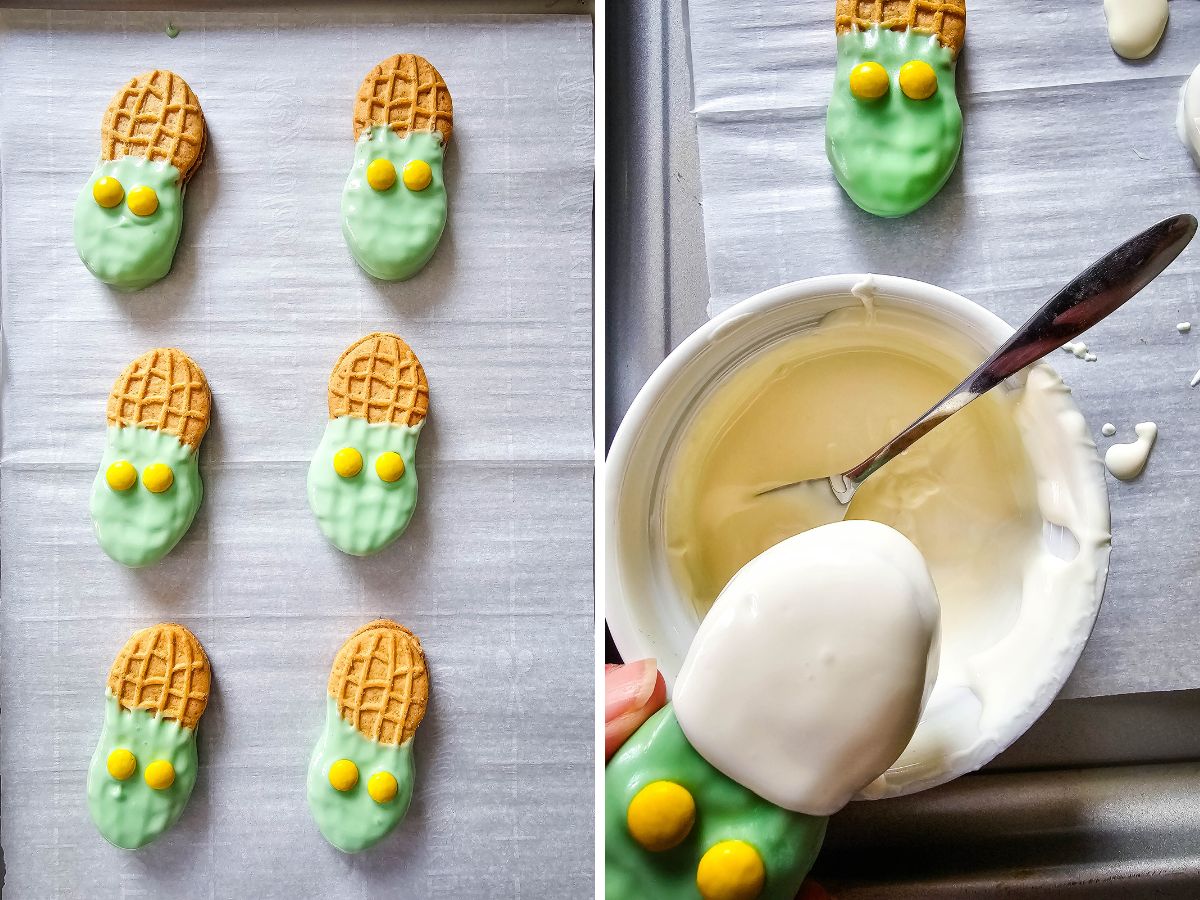
Add the yellow candies for the eyes. Melt white candy, dip the other end halfway for the hat rim; let set before proceeding to the next step.
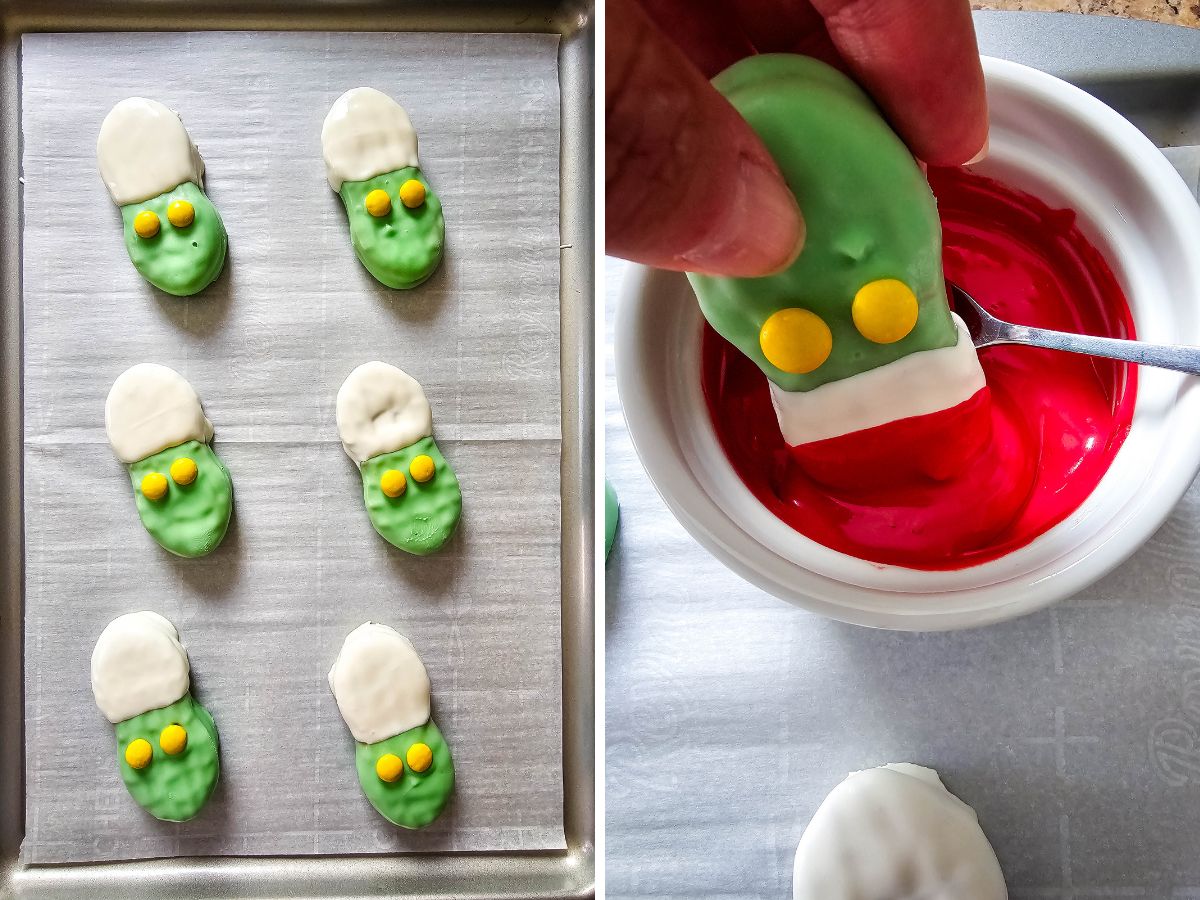
Melt red candy, dip again, leaving a thin white rim showing. Let harden.
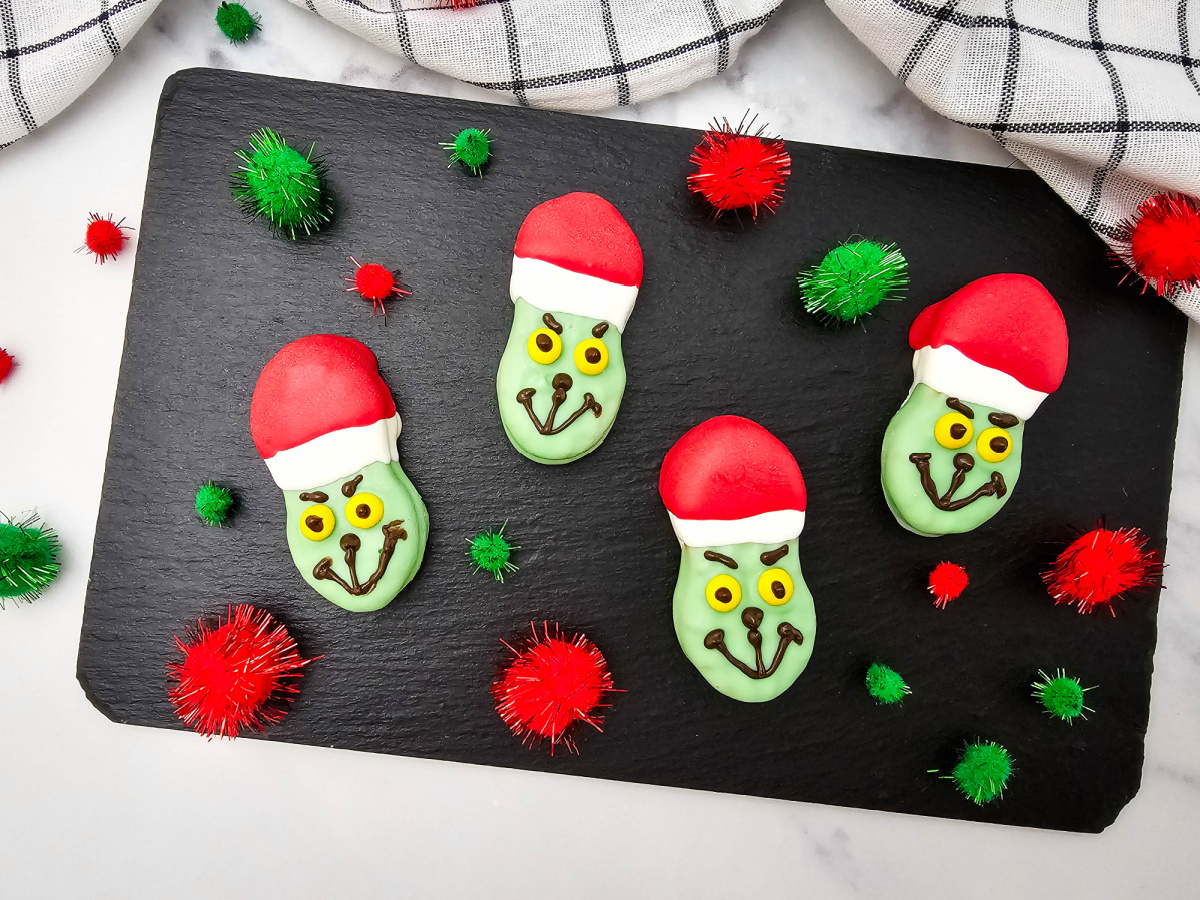
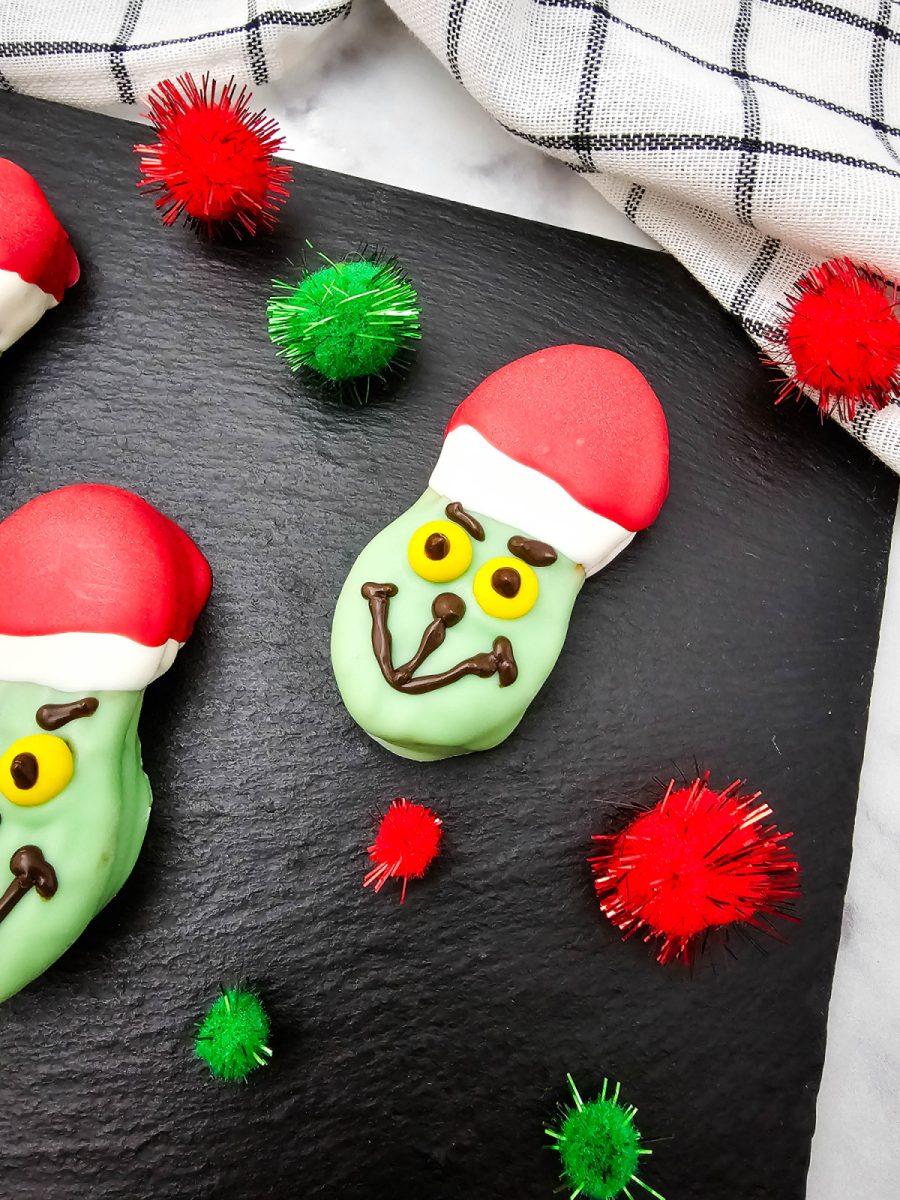
Pipe dark chocolate dots for pupils on the yellow M&Ms, add small eyebrow lines, then a nose below the eyes. Pipe a “U” or “V” mouth, add short lines at each end, and a vertical line from nose to mouth. Allow them to harden before serving or storing.
These adorable Christmas cookies are easily made and are such a fun holiday activity for the whole family.
Grinch Nutter Butter Cookies
Equipment
- Small microwave safe bowls
Ingredients
- 6 Nutter Butter Cookies
- ½ cup light green candy melts
- ⅓ cup white candy melts
- ¼ cup red candy melts
- 3 tablespoons dark chocolate candy melts
- 12 Mini yellow M&Ms
Instructions
- Prep the Candy and Cookies: Line a baking sheet with parchment paper. Place the green, white, and red candy melts into separate heat-safe bowls for melting. Add the dark chocolate melts to a pastry bag, ready for piping.
- Dip for the Face and Eyes: Melt the green candy in the microwave until smooth. Dip over half of each Nutter Butter into the melted green candy, tap off the excess, and place it on the tray. Immediately press two yellow mini M&M's onto the green coating for the eyes. Allow the green coating to set completely.
- Create the Hat: Melt the white candy melts and dip the uncoated end of the cookie just to the middle to form the straight hat rim; allow it to set. Next, melt the red candy and dip the white end, leaving a narrow white rim showing. Set on the tray and allow the candy coating to fully harden.
- Draw the Eyes: Melt the dark chocolate in the pastry bag. Snip the very end and pipe a small dot into the center of each yellow M&M for the pupils. Then, draw two small lines above each eye to define the eyebrows.
- Finish the Face: Pipe a single dot for the nose slightly below the center of the eyes. Finally, pipe the "U or V" shape for the mouth, add two short lines at each end of the mouth, and draw a final vertical line connecting the nose and the mouth.
- Allow to harden before serving or storing.
Nutritional Disclaimer
“Blogghetti” is not a dietician or nutritionist, and any nutritional information shared is an estimate. If calorie count and other nutritional values are important to you, we recommend running the ingredients through whichever online nutritional calculator you prefer. Calories and other nutritional values can vary quite a bit depending on which brands were used.
Christmas Cookies Week
I’m excited to be part of Christmas Cookies Week, a fun annual tradition where bloggers from all over share their favorite holiday cookie recipes. Hosted by Jolene from Jolene’s Recipe Journal, this event is a great way to find new festive treats and celebrate the season together.
- Marbled Ube Cookies by Karen’s Kitchen Stories
- M&M Oat Shortbread Bars by Jolene’s Recipe Journal
- OREO Cookies & Cream Molasses Spice Cookies by Faith, Hope, Love, & Luck Survive Despite a Whiskered Accomplice
Enjoy!


My favorite Christmas movie in cookie form. What a great addition to cookie trays, fun, colorful and delicious!
Another cute one! I’m beyond impressed.
Lisa, you just need to stop right now! The cuteness this week with these cookies is almost too much! I want to make them all!!!
These are super adorable! I’m so jealous of your decorating skills.
I’m not great but easy like this is best I do haha!