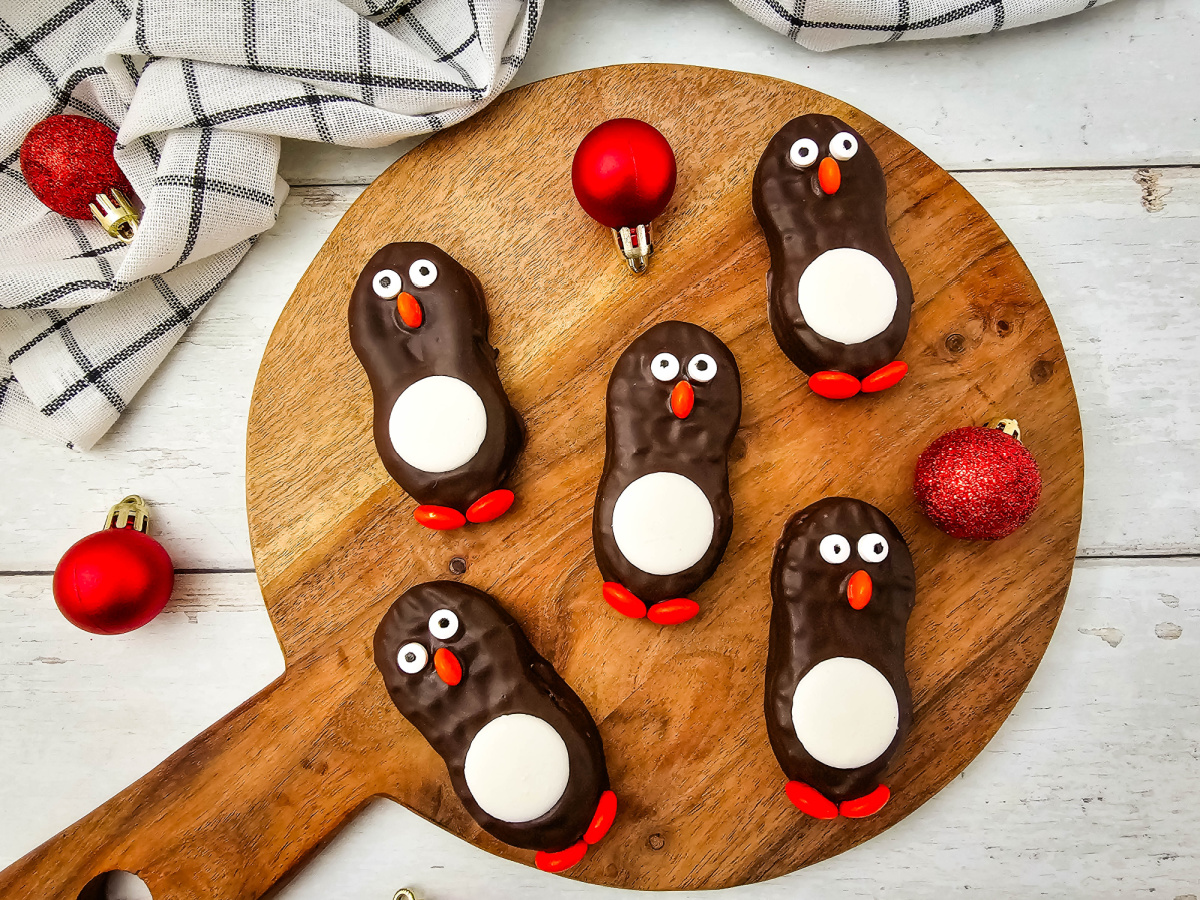
Penguin Nutter Butter Cookies
Penguin Nutter Butter Cookies are the most adorable no-bake holiday treat you have ever seen! These cute characters are the perfect addition to your Christmas dessert spread or any winter-themed party, complementing the Nutter Butter Snowman Cookies.
These holiday penguins are fun to make and are guaranteed to bring a smile to everyone’s face, from kids to adults. The classic combination of peanut butter and rich dark chocolate is always a winner, and transforming a simple Nutter Butter into a cheerful little Arctic friend makes for a delightful holiday activity.

Last year, I served my Nutter Butter Penguin Cookies alongside this Easy Santa Charcuterie Board for Christmas. They were a hit, especially paired with a few Santa Nutter Butter Cookies, with a quick game of Bobbing for Candy Canes adding extra fun. Everyone had a great time enjoying the treats together.
Penguin Nutter Butter Cookies
Making these adorable winter Nutter Butter penguins couldn’t be simpler! This is a total win for an easy, no-bake project that’s ready in minutes once your chocolate is melted. If you’re looking for an activity, this is perfect for getting the kids involved; they’ll have a blast helping with the candy decorations.
This recipe uses simple ingredients that are readily available at the grocery store. Using that classic, crunchy peanut butter wafer as the foundation, and coating it in smooth, rich dark chocolate. That contrast of salty peanut butter with the bittersweet chocolate is exactly what makes this treat so addictive. It’s just a fun, simple way to turn a pantry staple into the cutest holiday treats on the table.
Timesaving Tips and Variations
Working with melted chocolate can go more smoothly with a few simple tricks. Keeping your batches small helps prevent the chocolate from setting before decorating begins. You can also prep your decorations ahead of time to make assembly quicker.
- Work with a small number and a small amount of chocolate at a time. The dark chocolate will set quickly, and you want it wet enough for the candy eyes, beak, and feet to stick securely. I did them in batches of 6.
- Swap the dark chocolate melting wafers for milk chocolate or semi-sweet chocolate.
- Prep eyes, feet, and beaks in small bowls before starting.
- Use a cooling rack under your parchment to help set the chocolate faster.
These small adjustments will help ensure your creations are beautifully finished and ready to enjoy. Don’t be afraid to experiment a little and truly make these darling cookies your own!
Other Holiday Desserts to Try
These confections bring a festive touch to any holiday dessert table. They fit beautifully alongside other seasonal goodies and are always a conversation starter.
- Candy Cane Cookies
- Peppermint Ice Cream
- Christmas Fruitcake Biscotti
- Christmas Muddy Buddies
- Homemade Peanut Butter Cup Hot Chocolate

Frequently Asked Questions
You can make these up to two days ahead, and they store well in a cool, dry place. Keep them in a single layer to protect the decorations. Avoid humidity so the chocolate doesn’t sweat.
Yes, milk chocolate works well and offers a sweeter flavor. Just be sure to melt it the same way and watch for quicker thickening. Any chocolate melting wafer will work fine for this recipe.
This usually happens if the chocolate has started to set before you attach the decorations. To fix this, work in very small batches as recommended. If a piece still won’t stick, dip the back of the candy piece into a tiny bit of fresh melted chocolate and quickly press it on.
This post may contain Amazon or other affiliate links. As an Amazon Associate, I earn from qualifying purchases. For more information, see my disclosure policy.
Tools Needed for Making Chocolate Nutter Butters
A few simple tools help keep the decorating process smooth and enjoyable. Having everything laid out beforehand makes the project feel relaxed and fun.
Pyrex Essentials (3-Piece) Glass Mixing Bowls Set For Prepping, Baking and Cooking, Preheated Oven, Dishwasher, Freezer, and Microwave Safe Amazon Basics Ceramic Nonstick Baking Sheets & Cooling Rack Set, Non-Toxic, Half Sheet Size, 2-Pack, GrayReynolds Kitchens Pop-Up Parchment Paper Sheets, 10 x 13 Inches, 30 CountPlasticpro Plastic Serving Trays – Serving Platters Rectangle 9X13 Disposable Party Dish Includes 2 Green & 2 Red Christmas Trays


Ingredients for Penguin Nutter Butter Cookies
These ingredients create the charming character’s look that makes this treat so memorable. Each piece adds personality and brings your little penguins to life.
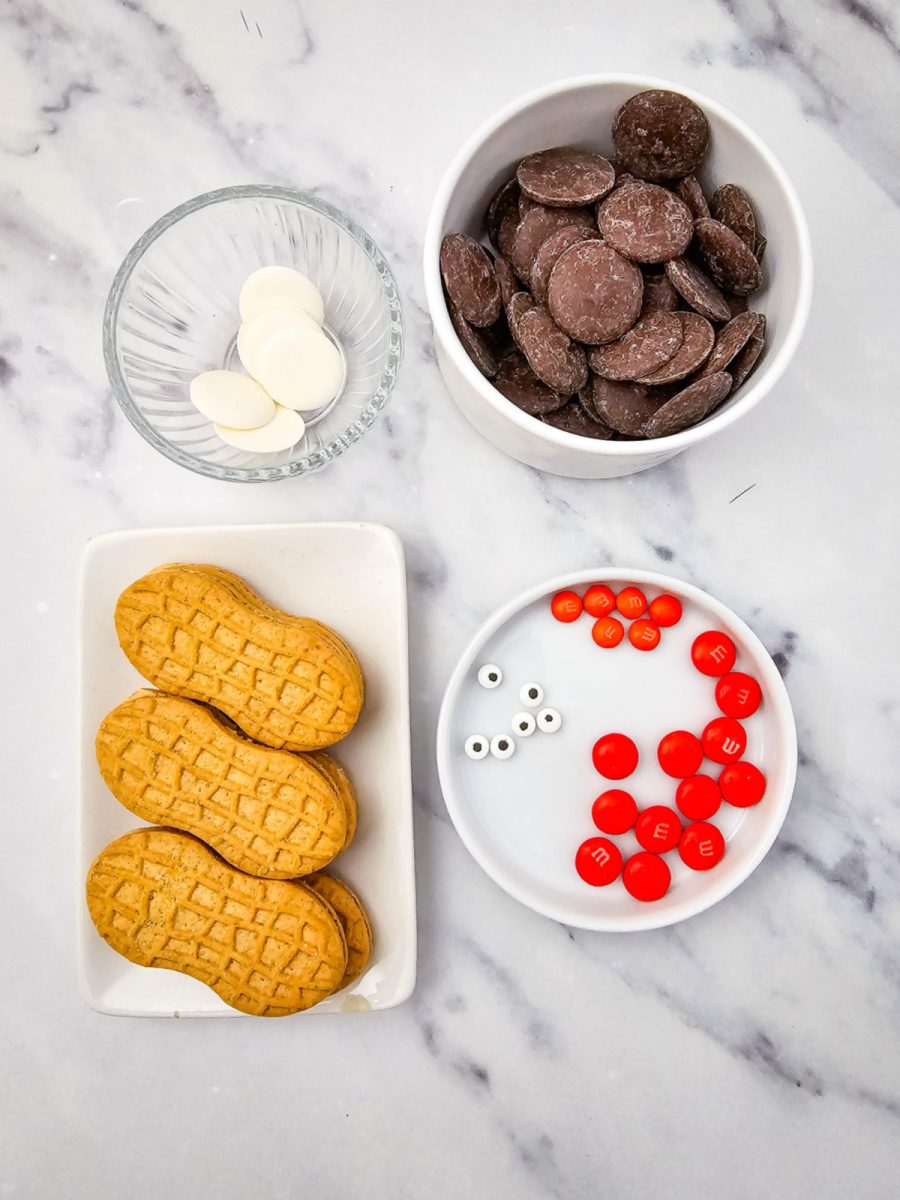
- Nutter Butter cookies – the perfect shape for the penguin body
- Chocolate and candy melts – dark chocolate for coating and white candy melts for the belly
- Orange M&Ms – regular-sized for the feet and mini M&Ms for the beak
- Candy eyeballs – to bring the penguins to life
How to Make Penguin Nutter Butter Cookies
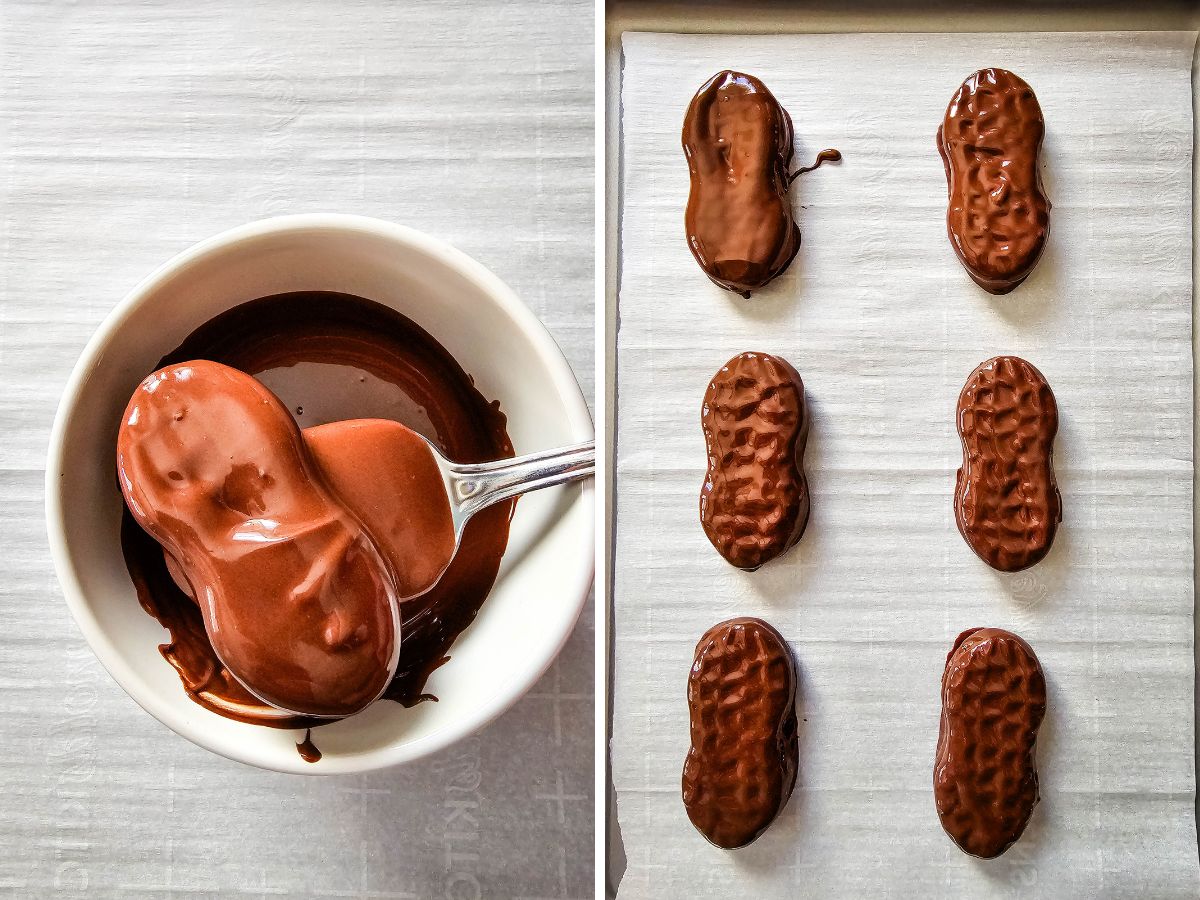
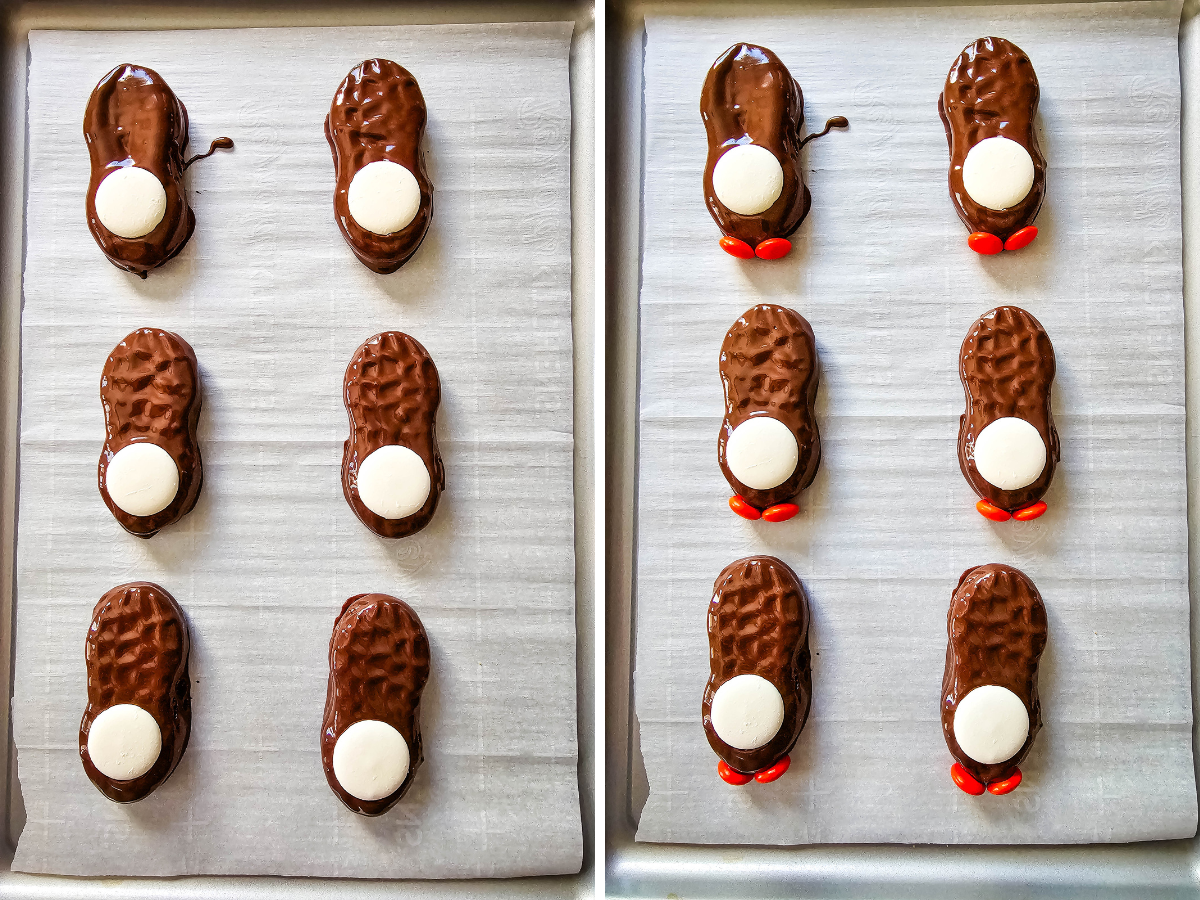
Line a baking sheet with parchment paper. Melt the dark chocolate in a microwave-safe bowl, heating in 30-second intervals and stirring until smooth. Dip each Nutter Butter into the melted chocolate, tap off excess, and place on the parchment.
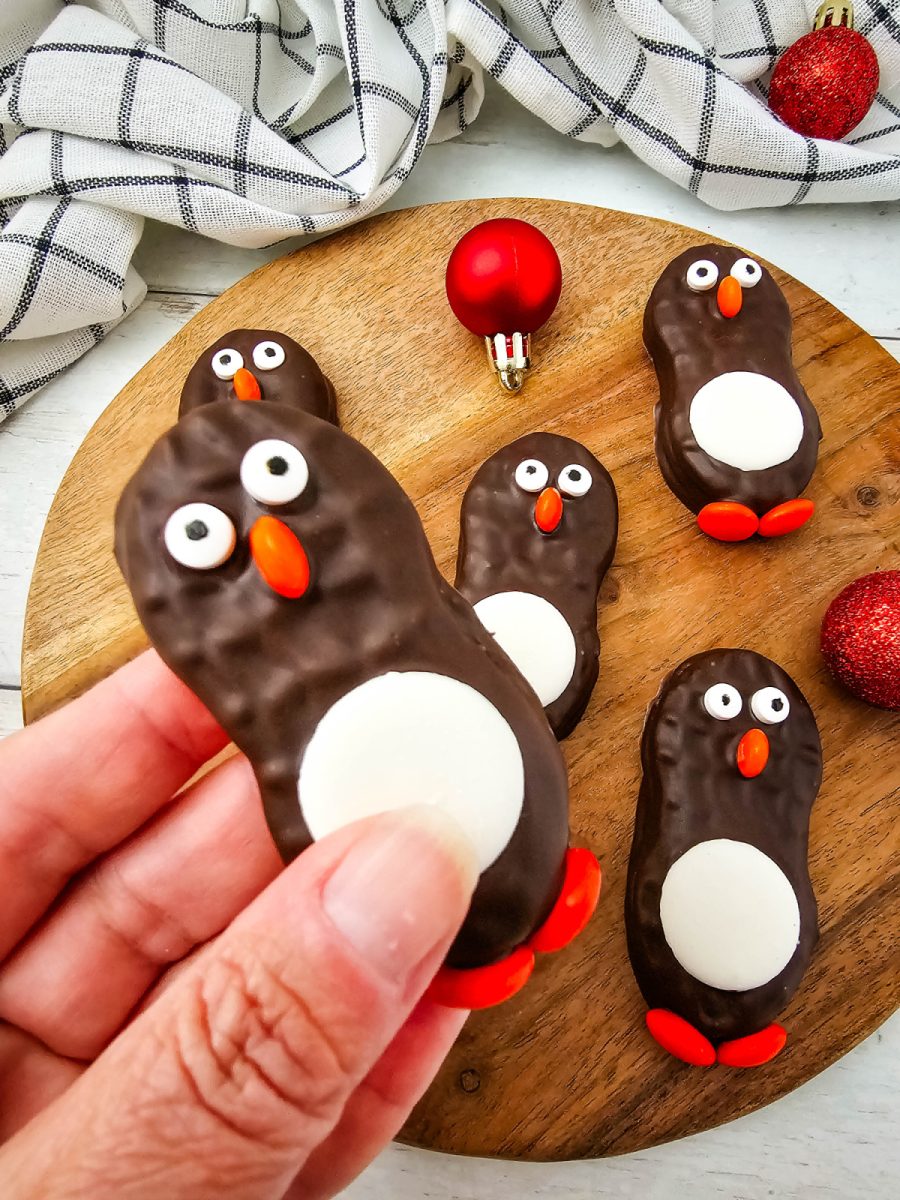
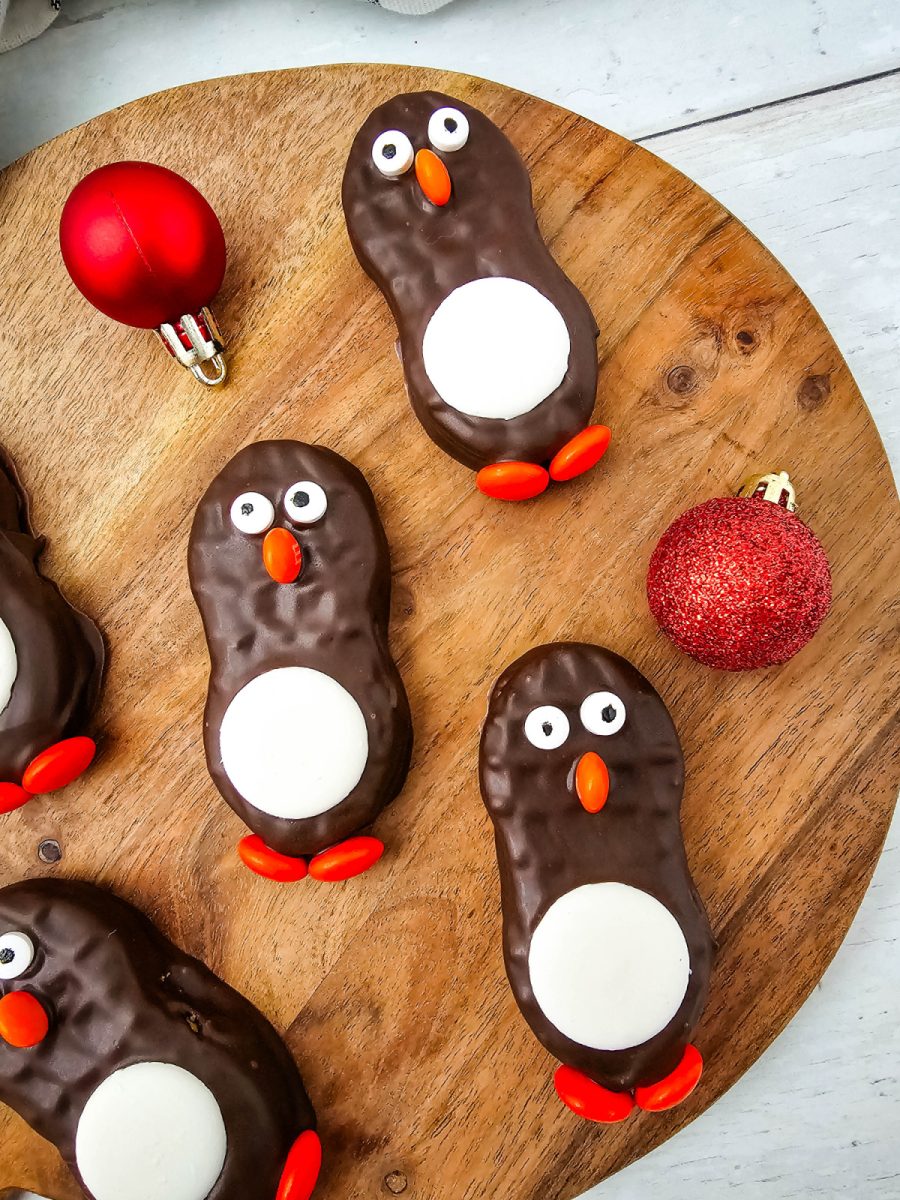
Add one white candy melt to the bottom center of each dipped Nutter Butter. Place two orange M&Ms along the bottom edge to form the feet.
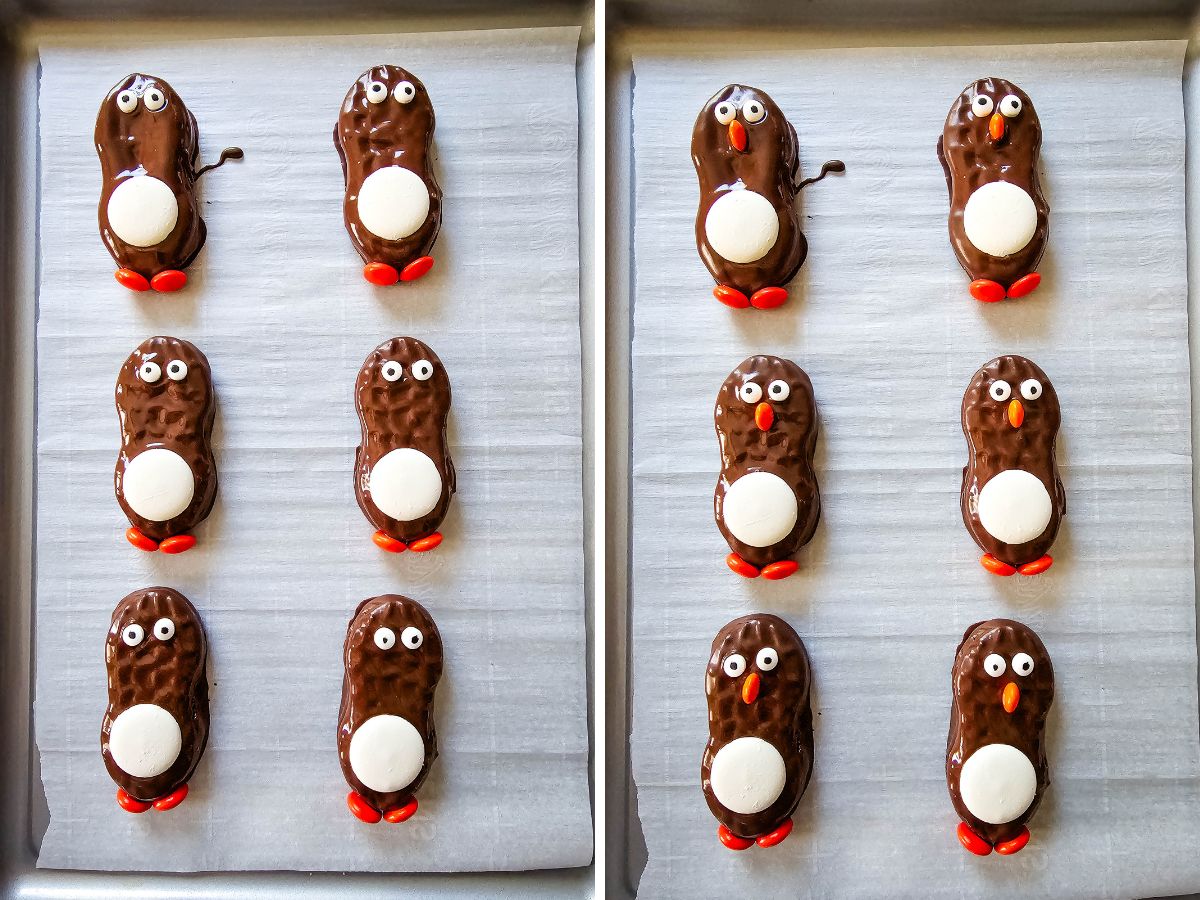
Add two candy eyeballs toward the top. Position one orange Mini M&M under the eyes to create the beak.
Allow them to set completely on the parchment paper until the chocolate coating is hard to the touch. Then, they are ready to be stored or shared.
Penguin Nutter Butter Cookies
Equipment
- Small microwave safe bowl
Ingredients
- 6 Nutter Butter cookies
- 1 cup dark chocolate melting wafers
- 6 white candy melts
- 12 regular Orange M&Ms
- 6 mini Orange M&Ms
- 12 edible candy eyes
Instructions
- Line a baking sheet with parchment paper.
- Add the dark chocolate to a microwave safe bowl and heat in 30 second intervals, stirring between each heat session, until fully melted.
- Dip each Nutter Butter into the melted chocolate, gently tapping off excess, then setting on the parchment paper.
- Set one white candy melt to the bottom center of each chocolate dipped Nutter Butter.
- Place two orange M&ms to the bottom edge for the feet.
- Add two candy eyeballs towards the top and one mini M&M between the eyes, slightly under for the beak.
- Allow to fully set before serving or storing.
Nutritional Disclaimer
“Blogghetti” is not a dietician or nutritionist, and any nutritional information shared is an estimate. If calorie count and other nutritional values are important to you, we recommend running the ingredients through whichever online nutritional calculator you prefer. Calories and other nutritional values can vary quite a bit depending on which brands were used.

Christmas Cookies Week
One of my favorite holiday traditions is #ChristmasCookiesWeek, hosted by Jolene from Jolene’s Recipe Journal. Each year, bloggers come together to share festive recipes, and it’s always a joy to see so many creative ideas. I’m thrilled to contribute and can’t wait for you to explore all the delicious creations!
- Peppermint Sugar Cookie Bars by Hezzi-D’s Recipe Box
- Holiday Sugar Cookie Cups by Jolene’s Recipe Journal
- Pistachio Cranberry Macaron by A Kitchen Hoor’s Adventures
- Double Chocolate Orange Buckwheat Cookies (redo) by Magical Ingredients
- Gluten Free Molasses Cookies by Art of Natural Living
- Christmas Cookie Brownies by The Spiffy Cookie
- Chocolate Cherry Bubbles by A Day in the Life on the Farm
- Buttery Oatmeal Raisin Molasses Spice Cookies by Faith, Hope, Love, & Luck Survive Despite a Whiskered Accomplice
- Browned Butter Chocolate Chunk Candy Cookies by Karen’s Kitchen Stories
Enjoy!


Sis’ school mascot is a penguin, going to have to pass these along to her! Wicked cute!
Another great Nutter Butter idea! These are adorable.
I’m loving all the creative ideas with the nutter butters. Adorable.
Oh my goodness…you were so right! These are just too cute!!! Perfect for winter!!!
These are adorable! I love penguins and these are so cute.
Oh, so cute! Now I’m longing for the days of kids Christmas events, where these would be amazing to share.
OMG! Such a cute idea! i am loving these easy cookies.