Thanksgiving!
Holiday crunch time. It’s that time of the year when you realize that after Thanksgiving it will be Christmas and you haven’t done a thing to prepare for it. For me, it is the shopping that I have yet to start. I never used to wait to almost the very day to get everything done. When my girls were young I would have everything shopped for and waiting to be wrapped by the end of October. Granted, it was so much easier to shop for them when it was just Barbies and the clothes they wore didn’t need to be “approved” by them first. Not to mention that the gifts they ask for now, are more expensive and bigger! As of this moment, I have bought one gift so I have some catch up to do, as usual.
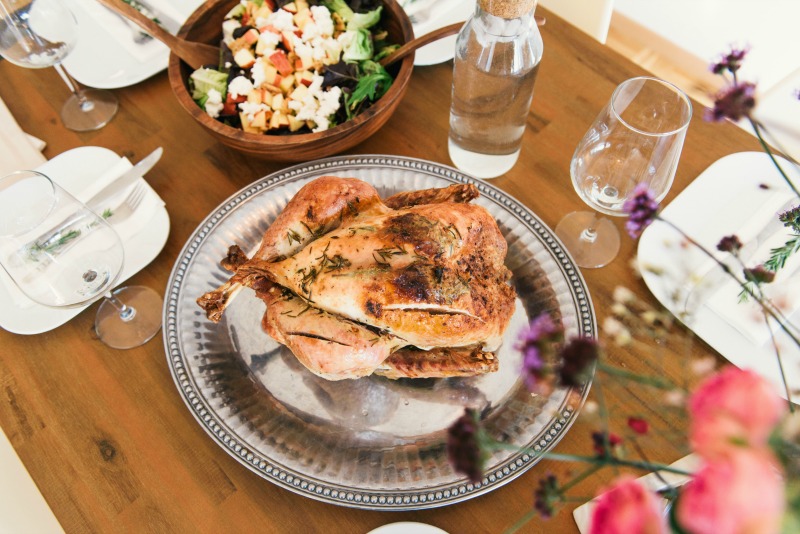
Now – let’s talk turkey!
How many people are coming to dinner? Not sure how big of a turkey you will need to feed everyone? You can use this general guide to plan or check out the Butterball site and use one of their proportion calculators to estimate the size of your turkey.
To prepare your turkey for roasting you will need to have the bird completely thawed out. If you purchase a frozen turkey, you will need to defrost it in the refrigerator for a few days prior to roasting it.
This handy chart is is from the USDA website.
|
In the Refrigerator (40 °F or below)
Allow approximately 24 hours for every 4 to 5 pounds |
|
|
4 to 12 pounds
|
1 to 3 days
|
|
12 to 16 pounds
|
3 to 4 days
|
|
16 to 20 pounds
|
4 to 5 days
|
|
20 to 24 pounds
|
5 to 6 days
|
Once your turkey is thawed, remove the neck and giblets (most turkeys bought in the grocery stores will have these parts in a pouch inside the turkey for easy removal.) You can save these parts to use in making turkey stock or to use in making gravy. I recall my Dad simmering the neck and giblets on the stovetop for hours to use the stock and giblets in making giblet gravy. For some reason, the gravy gene did not get passed down to me in this fashion so I rarely attempt this. It does make for great gravy though.
Preheat oven to 325 degrees.
Wash out the turkey with cold water and pat the turkey dry with paper towels.
Depending on the brand of turkey you buy, it may have a plastic or metal piece holding the legs together. If so, you need not remove this piece until the turkey is about 2/3 of the way cooked through. I generally keep it in until this point and then remove it so the insides of the thighs can cook more evenly. However, if your turkey doesn’t have this piece or you don’t want to use it, you will need to use some kitchen twine to tie the legs together.
At this point, you can stuff your turkey. If you do, it will add cooking time. If you choose not to stuff it, I would recommend placing a small onion, quartered; a carrot, cut into chunks; and a stalk of celery, cut into chunks inside the cavity of the turkey to give it more flavor.
Rub either a stick of softened butter or olive oil all over the outside of the turkey. Sprinkle salt, pepper and poultry seasoning all over the turkey.
Place the star of the show (the turkey) in the roasting pan breast side up and add about a half a cup of water (or chicken broth) to the bottom of the pan. Roast in oven according to chart.
|
Unstuffed
|
|
|
4 to 8 pounds (breast)
|
1½ to 3¼ hours
|
|
8 to 12 pounds
|
2¾ to 3 hours
|
|
12 to 14 pounds
|
3 to 3¾ hours
|
|
14 to 18 pounds
|
3¾ to 4¼ hours
|
|
18 to 20 pounds
|
4¼ to 4½ hours
|
|
20 to 24 pounds
|
4½ to 5 hours
|
|
Stuffed
|
|
|
4 to 6 pounds (breast)
|
Not usually applicable
|
|
6 to 8 pounds (breast)
|
2½ to 3½ hours
|
|
8 to 12 pounds
|
3 to 3½ hours
|
|
12 to 14 pounds
|
3½ to 4 hours
|
|
14 to 18 pounds
|
4 to 4¼ hours
|
|
18 to 20 pounds
|
4¼ to 4¾ hours
|
|
20 to 24 pounds
|
4¾ to 5¼ hours
|
While it is roasting, baste it with the juices at least once an hour to assist in the browning of the skin and to keep the bird moist.
About an hour before your turkey should be done (according to the charts above), insert a meat thermometer into the thickest part of the breast and thigh. You want to see a temperature of 170 degrees for the thigh (dark meat) and 160 degrees for the breast (white meat). Taking your turkey out at this point and letting it rest 15 – 20 minutes before slicing and eating it will allow it to finish cooking until its ultimate temperatures of 175 degrees for the dark meat and 165 degrees for the white meat, This resting time also allows the juices inside the turkey to disperse throughout it making for a moister meat.
If you stuffed your turkey, remove the stuffing to a serving bowl before slicing the turkey.
TIP: As with any raw poultry, to avoid cross contamination be sure to take precautions in preparing the turkey by using separate cutting boards and utensils and washing your hands thoroughly with soap and water after handling the turkey. Be sure to wash any cutting boards thoroughly as well to prevent any bacteria from spreading. One tip that I use is to dedicate one cutting board for raw meat and then after washing with very hot water and soap, disinfect the board with a bleach solution of 1 tablespoon bleach to a gallon of water. Let your board soak for about 5 minutes in the solution and then rinse with water and let dry.
Now Let’s Make Gravy:
Two ways to make Gravy
I admit, I am not a gravy person nor do I make it always from scratch but here are two ways that work.
Making Gravy with Corn Starch
Remove the roast from the pan. Place pan on stove on medium high heat. Pour off all but 2 tablespoons of the drippings in the pan.
Dissolve 2 tablespoons of corn starch in about 1/4 cup. Pour into pan with drippings and use a wire whisk to blend into the drippings until smooth.
Keep stirring with a wire whisk until the gravy begins to thicken, slowly adding your liquid (stock, water, milk, or cream) to the pan. Alternate stirring and adding liquid, until the gravy is the consistency you want. This will take about 5-6 minutes. Typically you will need about two cups of liquid total. Season the gravy with salt and pepper and herbs of your choice. I like to add thyme to mine.
Making Gravy with Flour
Remove the roast from the pan. Place pan on stove on medium high heat. Pour off all but 2 tablespoons of the drippings in the pan.
Whisk into the 2 tablespoons of drippings 1 to 2 tablespoons of flour. Stirring with a wire whisk until the flour has thickened and the gravy is smooth. Continue to cook slowly (about 1 minute) to brown the flour, and stir constantly.
Skim off the fat from the removed drippings and discard. Slowly add back some of the removed drippings. Then add either water, milk, stock, or cream to the gravy, just enough to make 2 cups when added to the drippings. Season the gravy with salt and pepper and herbs. I like to use thyme in mine.
Enjoy!


